

TODO List
Build a complete TODO list application with CRUD operations
In this tutorial, you’ll build a fully functional TODO list application. This is a step up from the QR Code Service tutorial - you’ll learn how to manage state, handle multiple operations, and create a polished user interface.
What you’ll build:
- A complete TODO app with add, complete, and delete functionality
- Thread-safe state management (important for desktop apps)
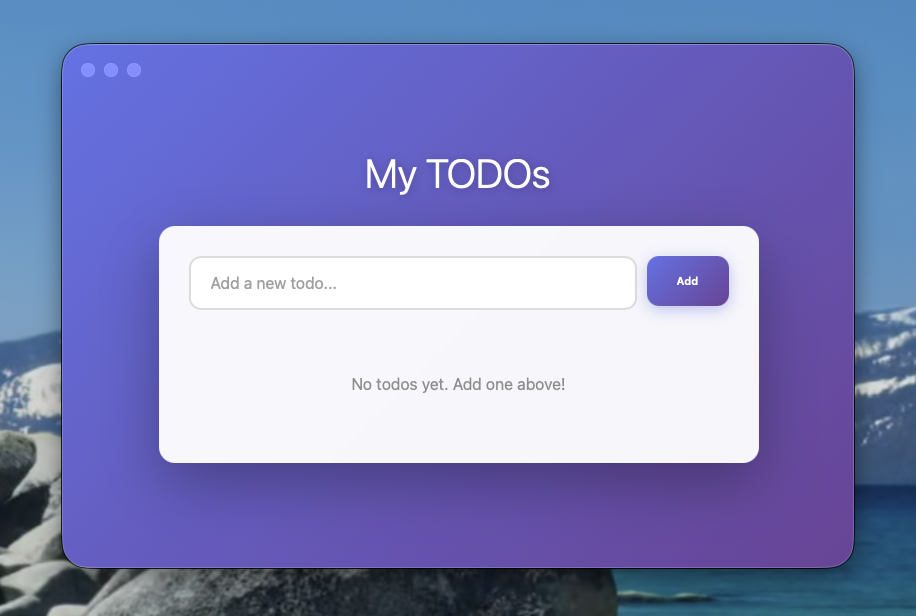
- Modern, glassmorphic UI design
- All using vanilla JavaScript - no frameworks required
What you’ll learn:
- CRUD operations (Create, Read, Update, Delete)
- Managing mutable state safely in Go
- Handling user input and validation
- Building responsive UIs that feel native
Time to complete: 20 minutes
Create Your Project
Generate the project
First, create a new Wails project. We’ll use the default vanilla template which gives us a clean starting point:
wails3 init -n todo-app
cd todo-app
This creates a new project with the basic structure: Go backend in the root, frontend code in the frontend/ directory.
Create the TODO service
The TODO service will manage our application state and provide methods for CRUD operations. Unlike a web server where each request is isolated, desktop apps can have multiple concurrent operations, so we need thread-safe state management.
Delete greetservice.go and create a new file todoservice.go:
package main

import (
    "errors"
    "sync"
)

type Todo struct {
    ID        int    `json:"id"`
    Title     string `json:"title"`
    Completed bool   `json:"completed"`
}

type TodoService struct {
    todos  []Todo
    nextID int
    mu     sync.RWMutex
}

func NewTodoService() *TodoService {
    return &TodoService{
        todos:  []Todo{},
        nextID: 1,
    }
}

func (t *TodoService) GetAll() []Todo {
    t.mu.RLock()
    defer t.mu.RUnlock()
    return t.todos
}

func (t *TodoService) Add(title string) (*Todo, error) {
    if title == "" {
        return nil, errors.New("title cannot be empty")
    }

    t.mu.Lock()
    defer t.mu.Unlock()

    todo := Todo{
        ID:        t.nextID,
        Title:     title,
        Completed: false,
    }
    t.todos = append(t.todos, todo)
    t.nextID++

    return &todo, nil
}

func (t *TodoService) Toggle(id int) error {
    t.mu.Lock()
    defer t.mu.Unlock()

    for i := range t.todos {
        if t.todos[i].ID == id {
            t.todos[i].Completed = !t.todos[i].Completed
            return nil
        }
    }
    return errors.New("todo not found")
}

func (t *TodoService) Delete(id int) error {
    t.mu.Lock()
    defer t.mu.Unlock()

    for i, todo := range t.todos {
        if todo.ID == id {
            t.todos = append(t.todos[:i], t.todos[i+1:]...)
            return nil
        }
    }
    return errors.New("todo not found")
}
What’s happening here:
The Todo struct:
- Defines the shape of our data with ID, Title, and Completed fields
json:tags tell Go how to convert this struct to JSON for the frontend- Each field is exported (capitalized) so the bindings generator can see it
The TodoService struct:
todos []Todo- a slice holding all our TODO itemsnextID int- tracks the next ID to assign (simulates auto-increment)mu sync.RWMutex- a read/write mutex for thread-safe access
Thread safety with sync.RWMutex:
- Desktop apps can have multiple concurrent operations from the UI
RLock()allows multiple readers at once (e.g., multipleGetAllcalls)Lock()gives exclusive access for writes (e.g.,Add,Toggle,Delete)deferensures locks are released even if the function returns early or panics
The methods:
GetAll()- Returns all todos (uses read lock since we’re not modifying data)Add(title)- Creates a new todo, validates input, increments IDToggle(id)- Flips the completed status of a todoDelete(id)- Removes a todo from the slice
Error handling:
- We return
erroras the last value following Go conventions - Empty titles are rejected
- Operations on non-existent todos return errors
- These errors become JavaScript exceptions in the frontend
Update main.go
Register the TODO service with your Wails application. Find the Services section in main.go and replace the GreetService with our TodoService:
Services: []application.Service{
    application.NewService(NewTodoService()),
},
What’s happening here:
- We’re removing the default GreetService and adding our TodoService instead
application.NewService()wraps our service so Wails can manage it- Wails will automatically generate JavaScript bindings for all public methods on this service
Create the frontend UI
Now let’s build the frontend. This is where we’ll call our Go methods and display the UI. We’re using vanilla JavaScript to keep things simple and show you how the bindings work directly.
Replace frontend/src/main.js:
import {TodoService} from "../bindings/changeme";

async function loadTodos() {
    const todos = await TodoService.GetAll();
    const list = document.getElementById('todo-list');

    list.innerHTML = todos.map(todo => `
        <div class="todo ${todo.completed ? 'completed' : ''}">
            <input type="checkbox"
                   ${todo.completed ? 'checked' : ''}
                   onchange="toggleTodo(${todo.id})">
            <span>${todo.title}</span>
            <button onclick="deleteTodo(${todo.id})">Delete</button>
        </div>
    `).join('');
}

window.addTodo = async () => {
    const input = document.getElementById('todo-input');
    const title = input.value.trim();

    if (title) {
        await TodoService.Add(title);
        input.value = '';
        await loadTodos();
    }
}

window.toggleTodo = async (id) => {
    await TodoService.Toggle(id);
    await loadTodos();
}

window.deleteTodo = async (id) => {
    await TodoService.Delete(id);
    await loadTodos();
}

// Load todos on startup
loadTodos();
What’s happening here:
Importing the bindings:
import {TodoService} from "../bindings/changeme"- brings in the auto-generated Go bindings- Note:
changemewill be your actual module name fromgo.mod
The loadTodos() function:
- Calls
TodoService.GetAll()to fetch all todos from Go - Builds HTML for each todo using template literals
- Dynamically adds/removes the
completedclass for styling - Uses
onclickattributes to connect buttons to our functions - Joins all the HTML together and injects it into the DOM
The CRUD functions:
addTodo()- Validates input, calls the GoAddmethod, refreshes the listtoggleTodo(id)- Calls Go’sTogglemethod, refreshes the listdeleteTodo(id)- Calls Go’sDeletemethod, refreshes the list- All functions are async because Go calls return Promises
Why attach to window:
window.addTodo = ...makes functions accessible from HTMLonclickattributes- This is a simple pattern for vanilla JS (frameworks handle this differently)
- In production, you might use proper event delegation instead
The refresh pattern:
- After each mutation (add/toggle/delete), we call
loadTodos()again - This ensures the UI stays in sync with the Go state
- Alternative: Have Go methods return the new state to avoid the second call
Update the HTML
The HTML provides the structure for our TODO app. It’s minimal and semantic - the magic happens in the JavaScript and CSS.
Replace frontend/index.html:
<!DOCTYPE html>
<html lang="en">
<head>
    <meta charset="UTF-8"/>
    <meta name="viewport" content="width=device-width, initial-scale=1.0"/>
    <title>TODO App</title>
    <link rel="stylesheet" href="./style.css"/>
</head>
<body>
    <div class="container">
        <h1>My TODOs</h1>
        <div class="card">
            <div class="input-box">
                <input type="text"
                       id="todo-input"
                       class="input"
                       placeholder="Add a new todo..."
                       onkeypress="if(event.key==='Enter') addTodo()">
                <button class="btn" onclick="addTodo()">Add</button>
            </div>
            <div id="todo-list"></div>
        </div>
    </div>
    <script type="module" src="./src/main.js"></script>
</body>
</html>
What’s happening here:
The structure:
container- centers our app and constrains the widthcard- the main white card holding everythinginput-box- flex container for the input and Add buttontodo-list- where individual todos will be injected by JavaScript
Event handling:
onkeypress="if(event.key==='Enter') addTodo()"- add todo when Enter is pressedonclick="addTodo()"- add todo when button is clicked- Inline event handlers work well for simple vanilla JS apps
Module script:
<script type="module">lets us use ES6 imports- Our
main.jsfile can import the bindings and use modern JavaScript
Style the app
The CSS creates a modern, glassmorphic design with smooth transitions. We’re going for a polished feel that makes the app enjoyable to use.
Replace frontend/public/style.css:
:root {
    font-family: "Inter", -apple-system, BlinkMacSystemFont, "Segoe UI", "Roboto",
    "Oxygen", "Ubuntu", "Cantarell", "Fira Sans", "Droid Sans", "Helvetica Neue",
    sans-serif;
    font-size: 16px;
    background: linear-gradient(135deg, #667eea 0%, #764ba2 100%);
    color: rgba(255, 255, 255, 0.87);
}

body {
    margin: 0;
    display: flex;
    place-items: center;
    justify-content: center;
    min-height: 100vh;
}

.container {
    width: 100%;
    max-width: 600px;
    padding: 20px;
}

h1 {
    text-align: center;
    color: white;
    font-size: 2.5em;
    font-weight: 300;
    margin: 0 0 30px 0;
    text-shadow: 0 2px 10px rgba(0, 0, 0, 0.2);
}

.card {
    background: rgba(255, 255, 255, 0.95);
    backdrop-filter: blur(10px);
    border-radius: 16px;
    padding: 30px;
    box-shadow: 0 20px 60px rgba(0, 0, 0, 0.3);
}

.input-box {
    display: flex;
    gap: 10px;
    margin-bottom: 25px;
}

.input {
    flex: 1;
    border: 2px solid #e0e0e0;
    border-radius: 12px;
    height: 50px;
    padding: 0 20px;
    font-size: 16px;
    transition: all 0.3s ease;
}

.input:focus {
    border-color: #667eea;
    outline: none;
    box-shadow: 0 0 0 3px rgba(102, 126, 234, 0.1);
}

.btn {
    height: 50px;
    padding: 0 30px;
    border: none;
    border-radius: 12px;
    background: linear-gradient(135deg, #667eea 0%, #764ba2 100%);
    color: white;
    font-weight: 600;
    cursor: pointer;
    transition: all 0.3s ease;
    box-shadow: 0 4px 15px rgba(102, 126, 234, 0.4);
}

.btn:hover {
    transform: translateY(-2px);
    box-shadow: 0 6px 20px rgba(102, 126, 234, 0.6);
}

#todo-list {
    display: flex;
    flex-direction: column;
    gap: 10px;
}

.todo {
    display: flex;
    align-items: center;
    padding: 18px 20px;
    background: white;
    border: 2px solid #f0f0f0;
    border-radius: 12px;
    transition: all 0.3s ease;
    gap: 15px;
}

.todo:hover {
    border-color: #667eea;
    box-shadow: 0 4px 12px rgba(102, 126, 234, 0.15);
    transform: translateX(4px);
}

.todo.completed {
    opacity: 0.6;
}

.todo.completed span {
    text-decoration: line-through;
    color: #999;
}

.todo input[type="checkbox"] {
    width: 24px;
    height: 24px;
    cursor: pointer;
    appearance: none;
    -webkit-appearance: none;
    border: 2px solid #667eea;
    border-radius: 6px;
    position: relative;
    transition: all 0.3s ease;
    flex-shrink: 0;
}

.todo input[type="checkbox"]:hover {
    background: rgba(102, 126, 234, 0.1);
}

.todo input[type="checkbox"]:checked {
    background: #667eea;
    border-color: #667eea;
}

.todo input[type="checkbox"]:checked::after {
    content: '✓';
    position: absolute;
    color: white;
    font-size: 16px;
    font-weight: bold;
    top: 50%;
    left: 50%;
    transform: translate(-50%, -50%);
}

.todo span {
    flex: 1;
    font-size: 16px;
    color: #333;
}

.todo button {
    padding: 8px 16px;
    background: #ff4757;
    color: white;
    border: none;
    border-radius: 8px;
    font-size: 14px;
    font-weight: 600;
    cursor: pointer;
    transition: all 0.3s ease;
    opacity: 0;
    flex-shrink: 0;
}

.todo:hover button {
    opacity: 1;
}

.todo button:hover {
    background: #ee5a6f;
    transform: scale(1.05);
}

#todo-list:empty::before {
    content: "No todos yet. Add one above!";
    display: block;
    text-align: center;
    padding: 40px 20px;
    color: #999;
}
What’s happening here:
Glassmorphic design:
background: linear-gradient(135deg, #667eea 0%, #764ba2 100%)- purple gradient backgroundbackdrop-filter: blur(10px)- creates the frosted glass effect on the cardrgba(255, 255, 255, 0.95)- semi-transparent white for the glass effect
Custom checkbox styling:
appearance: noneremoves the default browser checkbox- We create a custom rounded square with a checkmark using
::after - The checkmark appears when
checkedusing a ✓ unicode character
Hover interactions:
- Todos slide right on hover (
transform: translateX(4px)) - Delete button is hidden until hover (
opacity: 0→opacity: 1) - Buttons scale up slightly on hover for tactile feedback
Empty state:
#todo-list:empty::beforeshows a message when there are no todos- CSS-only solution - no JavaScript needed
Run the app
Let’s see it in action! Run the development server:
wails3 dev
The app will compile and open. Try it out:
- Type a todo and press Enter or click Add
- Click the checkbox to mark it complete
- Hover over a todo to see the delete button appear
- Notice how the UI updates instantly - that’s our refresh pattern working
What’s happening:
- Wails automatically generated bindings for your TodoService methods
- Dev mode includes hot reload - try changing the CSS and watch it update
- Your Go code is running natively - no translation or interpretation needed
How It Works
Thread-Safe State Management
The sync.RWMutex provides safe concurrent access:
func (t *TodoService) GetAll() []Todo {
    t.mu.RLock()  // Read lock - multiple readers allowed
    defer t.mu.RUnlock()
    return t.todos
}

func (t *TodoService) Add(title string) (*Todo, error) {
    t.mu.Lock()  // Write lock - exclusive access
    defer t.mu.Unlock()
    // ... mutations
}
Why this matters:
- Multiple frontend calls can happen concurrently
- Read operations don’t block each other
- Write operations get exclusive access
deferensures locks are always released
Error Handling
The service returns errors for invalid operations:
func (t *TodoService) Add(title string) (*Todo, error) {
    if title == "" {
        return nil, errors.New("title cannot be empty")
    }
    // ...
}
In the frontend, you can catch these:
try {
    await TodoService.Add(title);
} catch (err) {
    alert('Error: ' + err);
}
State Synchronization
After each mutation, we reload the full list:
window.addTodo = async () => {
    await TodoService.Add(title);  // Mutation
    await loadTodos();             // Refresh
}
Alternative approach: Return the updated list from each method to avoid the second call.
Enhancements
Add Statistics
Add this to todoservice.go:
type TodoStats struct {
    Total     int `json:"total"`
    Completed int `json:"completed"`
    Active    int `json:"active"`
}

func (t *TodoService) GetStats() TodoStats {
    t.mu.RLock()
    defer t.mu.RUnlock()

    stats := TodoStats{
        Total: len(t.todos),
    }

    for _, todo := range t.todos {
        if todo.Completed {
            stats.Completed++
        } else {
            stats.Active++
        }
    }

    return stats
}
Display in the frontend:
async function loadTodos() {
    const [todos, stats] = await Promise.all([
        TodoService.GetAll(),
        TodoService.GetStats()
    ]);

    // Display stats
    document.getElementById('stats').textContent =
        `${stats.active} active, ${stats.completed} completed`;

    // ... render todos
}
Add “Clear Completed”
func (t *TodoService) ClearCompleted() int {
    t.mu.Lock()
    defer t.mu.Unlock()

    removed := 0
    newTodos := []Todo{}

    for _, todo := range t.todos {
        if !todo.Completed {
            newTodos = append(newTodos, todo)
        } else {
            removed++
        }
    }

    t.todos = newTodos
    return removed
}
Add Persistence
For production apps, add persistence using the storage solution that best fits your application, such as SQLite, PostgreSQL, or a hosted service.
Build for Production
When you’re ready to distribute your TODO app, build it for production:
wails3 build
This creates an optimized native executable in bin/:
- Compiles your Go code with optimizations
- Builds your frontend for production
- Bundles everything into a single executable
- The resulting app is typically 10-20MB (compare to Electron’s 150MB+)
You can run the executable directly - no runtime needed, no servers to start. It’s a true native application.
What You Built
You just built a complete TODO application with:
Full CRUD implementation:
- Created a service with Create, Read, Update, and Delete operations
- Added input validation and error handling
- Learned how Go errors become JavaScript exceptions
Thread-safe state management:
- Used
sync.RWMutexto handle concurrent access safely - Understood the difference between read locks (RLock) and write locks (Lock)
- Saw how
deferprevents deadlocks by guaranteeing cleanup
Modern, polished UI:
- Built a glassmorphic interface with gradients and blur effects
- Created custom-styled checkboxes without any framework
- Added hover interactions and transitions for a native feel
- Implemented an empty state with pure CSS
Wails fundamentals:
- Service registration and automatic binding generation
- Calling Go methods from JavaScript with async/await
- State synchronization between Go and the frontend
- Building and packaging a native desktop app
Next Steps
Now that you understand CRUD operations and state management, try:
- Add persistence: Make todos survive app restarts with SQLite or another storage solution
- Add more features: Filtering (all/active/completed), editing existing todos, bulk operations
- Explore the Notes tutorial: See how file operations work in Notes
- Build something real: Take these concepts and build your own app!